Adding Offices and People
The Offices section of your project lists all the operational offices you’ve added.
To add a new office, simply click the “New” button and fill in the required fields.

By right-clicking on the grid header, you can select additional information to display in the list of offices. This feature is crucial for effective data export and import via .csv files (only displayed data is exported). From the toolbar above, in addition to creating, modifying, and deleting an office, you can also import/export data in CSV format.

Selecting a single office from the list opens a detail area for that office, containing the following sections:
-
Details: Contains the detailed fields for the office, the option to view its history
, and the ability to initiate project-level prints. -
Attributes: (see Attributes section)
Attribute Management
Section titled “Attribute Management”The Attributes area allows you to enrich resources with specific information by associating customized details. Each attribute is defined by:
- Name: The identifier of the attribute.
- Unit of Measure: If applicable, the unit in which the value is expressed.
- Value: The actual data of the attribute.
Add an Attribute
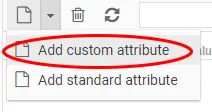
Section titled “Add an Attribute”To add a new attribute, select the New icon
- Standard Attribute: Selecting this option will open a dialog box with a list of predefined attributes. This allows you to quickly associate common and structured information.
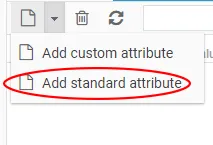
- Custom Attribute: If the desired information is not available among the standard attributes, you can create a custom attribute. Simply select Add custom attribute and freely define the name, unit of measure, and value.
Edit and Delete
Section titled “Edit and Delete”You can edit any attribute (standard or custom) by simply double-clicking on the desired field. To delete an attribute, select it and click the Delete icon
Practical Example
Section titled “Practical Example”Consider the “Turin Office” resource. You can associate attributes such as:
-
Name: Square Meters
-
Unit of measure: sqm
-
Value: 1500
-
Name: Wall Height
-
Unit of measure: m
-
Value: 3.2
Person
Section titled “Person”The Person section collects the personal data of all personnel involved in the project, whether internal or external. From the toolbar above, you can:
- Add a new employee or external person by selecting .
- Quickly search for a person by first or last name.
- Import/export user lists in .csv format using the andicons.
- View inactive person by clicking on .
By selecting a person, you can view their details, organized into different tabs. Each tab displays specific elements related to the selected person, if present:
- Details: Shows personal data and basic information. For more on “Associated user” and “User permissions,” refer to the Related User and Permissions System sections.
- Contacts, which allows you to enter various contact channels.
- Work Phases: Displays the work phases associated with the person.
- Duties: Lists the duties held.
- Homogeneous Groups: Shows the homogeneous groups they belong to.
- Organizational Units: Indicates the relevant organizational units.
- Safety Organizational Chart: Details the specific roles assumed in the context of safety.
- Actions: Lists assigned preventive actions.
- Events: Contains a list of accidents, near misses, or non-conformities in which the person was involved.
- Attachments: Displays documents attached to the person.
In addition to modifying personal data, you can view the history of changes by clicking the